Sunday, April 30, 2017
Shut Down Your Friends Computer Whereas Youre on Net
Shut Down Your Friends Computer Whereas Youre on Net
Hi friends! Windows XP provides several utilities to create their victimisation convenient. youll conjointly remote closedown anyones Pcs. computer. whereas youre on net. youll do this on your Friends/Enemys laptop simply to harass him. simply Follow the easy steps-
Seeb This technique
1 Right click my laptop, opt for manage.
2 Highlight the pc Management (Local) then click on Action, opt for connect with another laptop.
3 within the window that opens fill within the machine name of the computer you wish to attach to and click on ok.
4 Once connected right click on laptop Management (Remote machine name) and opt for properties.
5 visit the "Advanced" tab and click on the Settings button beneath set out and recovery.
5 Click on the closedown button.
half-dozen beneath action opt for what you wish to try to to (you will close current user, shut down, restart, or power down. youll conjointly opt for if you wish to force all applications to shut, shut adorned apps, or watch for all apps to shut by themselves).
7 The second method... bear in mind dos... that smart recent factor. Open up a electronic communication and enter within the following:
8 %windir%System32shutdown.exe -r -m Machinename. The electronic communication has a lot of switches and choices. I extremely recommend victimisation closedown.exe /? to envision all the posibilities.
You Friends computer closedown
Thanks.
Go to link Download
Resetter Epson L1300 Free Download
Resetter Epson L1300 Free Download
Resetter Epson L1300 Free Download

- If you want to reset the printer counters waste - you need to get Crucial advice with the keys in it in WIC Energy Set.
- Did you ever find start your inkjet printer providing content of the notice?
- The service is called for. Area in your computer printer are near the stop that using lifestyle after you get your ink jet printer. Pay attention to your printer paper for inkjet
- The waste ink pad printer in Epson printers L1300 tempered
- Part of your inkjet printer closer the end of their service availability. Make sure you talk with your paper printing machine
- Printer ink Patch life of the head to complete their program. Epson calls for help
- Patch printer ink printer approaching final style of their life. Please contact Epson support.
- Or maybe the printer when you essentially stopped functioning and even the smoke problem offers Email:
- Mandatory Program. Section through a computer printer that you got to stop their life expectancy
- Material waste ink pad in the doll computer printers. Contact the dealer to change
Resetter Epson L1300 Free Download
Go to link Download
Resource Hacker
Resource Hacker

Resource Hacker™ has been designed to be the complete resource editing tool: compiling, viewing, decompiling and recompiling resources for both 32bit and 64bit Windows executables. Resource Hacker™ can open any type of Windows executable (*.exe; *.dll; *.scr; *.mui etc) so that individual resources can be added modified or deleted within these files. Resource Hacker™ can create and compile resource script files (*.rc), and edit resource files (*.res) too.
Dialog controls can be visually resized and/or moved, with any changes being reflected in the resource script automatically. Conversion between screen pixels and dialog units is done automatically. Select a control by clicking it in the displayed dialog. Alternatively, the Tab or Shift-Tab keys can be used to select next or prior controls respectively. The selected control will show resizing handles. To move a control without resizing, once the control has been selected, click and drag it to its new location. The arrow keys can also be used to move a control once it has been selected. A control can be resized by clicking and dragging one of its resizing handles. Alternatively, the arrow keys combined with the shift key can be used to resize a control.
The Dialog Editor can be opened from the popup menu which is displayed by right-clicking the preview dialog. The Control Editor can be opened from the same menu once a control has been selected.
Version 4.2.5
Last updated: 17 August 2015
Copyright © 1999-2015 Angus Johnson
Freeware - no nags, no ads and fully functional.
Go to link Download
Sejarah Sulawesi Tengah
Sejarah Sulawesi Tengah
Semenjak tahun 1905, wilayah Sulawesi Tengah seluruhnya jatuh ke tangan Pemerintahan Hindia Belanda, dari Tujuh Kerajaan Di wilayah Timur dan Delapan Kerajaan Di wilayah Barat, kemudian oleh Pemerintah Hindia Belanda dijadikan Landschap-landschap atau Pusat-pusat Pemerintahan Hindia Belanda yang meliputi, antara lain:
1. Poso Lage di Poso
2. Lore di Wianga
3. Tojo di Ampana
4. Pulau Una-una di Una-una
5. Bungku di Bungku
6. Mori di Kolonodale
7. Banggai di Luwuk
8. Parigi di Parigi
9. Moutong di Tinombo
10. Tawaeli di Tawaeli
11. Banawa di Donggala
12. Palu di Palu
13. Sigi/Dolo di Biromaru
14. Kulawi di Kulawi
15. Tolitoli di Tolitoli
Pada mulanya hubungan tersebut masih bersifat lunak dalam bentuk hubungan persahabatan dagang, tetapi lama kelamaan hubungan tersebut makin mengikat dengan berbagai perjanjian. Kesempatan ini dimanfaatkan oleh Belanda untuk menaklukkan sebagian raja-raja di Sulawesi Tengah. Bahkan raja yang tidak mau tunduk dibawah kekuasaannya dipaksa melalui peperangan. Pada zaman pemerintahan Belanda awal abad XX pulau Sulawesi dibagi atas dua provinsi yaitu Sulawesi Selatan dengan ibukota Makassar dan Sulawesi Utara dengan ibukota Manado. Setiap provinsi dibagi menjadi afdeling dan setiap afdeling dibagi menjadi onder afdeling serta setiap onder afdeling terdiri dari beberapa kerajaan.
Dengan datangnya pemerintahan Jepang tahun 1942 di Sulawesi Tengah praktis berlaku administrasi pemerintahan militer yang tidak jauh beda dengan Belanda. Dari organisasi dan para raja inilah timbul ide untuk membentuk daerah otonom Sulawesi Tengah. Pada tahun 1949 lima belas orang raja yang memerintah di 15 kerajaan di Sulawesi Tengah mengadakan pertemuan di Tentena untuk membicarakan perlunya dibentuk daerah otonom Sulawesi Tengah yang wilayahnya terdiri dari 15 kerajaan tersebut. Sebagai koordinator/ketua dari 15 dewan raja tersebut dipilih R. M. Pusadan yang juga sebagai Kepala Daerah Otonom dengan ibu kota Poso. Pemerintahan dewan raja ini hanya berlangsung hingga tahun 1950. Melalui PP No. 33 tahun 1952 Sulawesi Tengah yang tadinya hanya satu kabupaten dengan ibukota Poso, dibagi lagi menjadi dua daerah administratif setingkat kabupaten yaitu kabupaten Poso dengan ibukota Poso dibawah pimpinan Kepala Daerah Abdul Latif Daeng Masikki dan Kabupaten Donggala dengan ibukota Palu di bawah pimpinan Kepala Daerah Intje Naim Daeng Mamangun. Keadaan kedua Wilayah ini berlangsung hingga tahun 1956.
Pada bulan Juli 1957 Permesta memproklamirkan berdirinya Provinsi Sulawesi Utara (melepaskan diri dari Gubernur Sulawesi di Makassar) yang mencakup wilayah Sulawesi Tengah dengan Gubernur H. D. Manoppo. Namun para tokoh masyarakat Sulawesi Tengah dari berbagai aliran dan golongan serta para pemuda tidak setuju dengan tindakan indisiplier Permesta tersebut. Para tokoh yang tergabung dalam GPPST (Gerakan Penuntut Provinsi Sulawesi Tengah) bertekad untuk mempertahankan daerah Sulawesi Tengah serta memperjuangkan Provinsi Sulawesi Tengah yang otonom. Pada tahun 1959 berdasarkan UU No. 29 tahun 1959, Keresidenan Koordinator Sulawesi Tengah yang tadinya hanya membawahi dua kabupaten, dirubah menjadi empat kabupaten, yaitu:
1. Kabupaten Donggala dengan ibukota Palu
2. Kabupaten Tolitoli dengan ibukota Tolitoli
3. Kabupaten Poso dengan ibukota Poso
4. Kabupaten Banggai dengan ibukota Luwuk.
Sedangkan bekas Kewedanaan Buol yang tadinya masuk wilayah Kabupaten Gorontalo digabungkan ke dalam wilayah daerah Kabupaten Buol Tolitoli tahun 1960. Status Propinsi Administratif Sulawesi berakhir pada tahun 1960 yang ditetapkan dengan UU No. 47 tahun 1960 dan secara otonom membagi Sulawesi menjadi Provinsi Sulawesi Selatan Tenggara dengan ibukota Makassar dan Provinsi Sulawesi Utara Tengah dengan ibukota Manado. Dalam kurang lebih sepuluh tahun sejarah perjuangan pembentukan Provinsi Sulawesi Tengah, oleh Pemerintah Pusat dikenal delapan macam konsepsi. Dari kedelapan konsepsi tersebut yang disetujui dan diterima oleh Pemerintah Pusat adalah "Konsepsi Mahasiswa Sulawesi Tengah" atau juga dikenal sebagai "Konsepsi Rusdi Roana-Rene Lamakarate". Akhirnya pada tahun 1964 melalui PERPU No. 2 tahun 1964 tentang pembentukan Provinsi Sulawesi Tengah dengan ibukota Palu, yang disahkan dengan UU No. 13 yang diundangkan pada tanggal 23 September 1964, dan berlaku surut tanggal 1 Januari 1964 (LN No. 64 tahun 1964) yang wilayahnya meliputi:
1. Kabupaten Poso = 24.122 Km2
2. Kabupaten Donggala = 23.496 Km2
3. Kabupaten Banggai = 13.163 Km2
4. Kabupaten Buol Tolitoli = 7.261 Km2
Tahun 1964 dengan Peraturan Pemerintah Pengganti Undang-undang Nomor 2 Tahun 1964 terbentuklah Daerah Tingkat I Sulawesi Tengah yang meliputi empat kabupaten yaitu Kabupaten Donggala, Kabupaten Poso, Kabupaten Banggai dan Kabupaten Buol Toli-toli. Selanjutnya Pemerintah Pusat menetapkan Provinsi Sulawesi Tengah sebagai Provinsi yang otonom berdiri sendiri yang ditetapkan dengan Undang undang Nomor 13 Tahun 1964 tentang Pembentukan Provinsi Daerah Tingkat I Sulawesi Tengah.
Dengan perkembangan Sistem Pemerintahan dan tuntutan Masyarakat dalam era Reformasi yang menginginkan adanya pemekaran Wilayah menjadi Kabupaten, maka Pemerintah Pusat mengeluarkan kebijakan melalui Undang-undang Nomor 11 tahun 2000 tentang perubahan atas Undang-undang Nomor 51 Tahun 1999 tentang pembentukan Kabupaten Buol, Morowali dan Banggai Kepulauan. Kemudian melalui Undang-undang Nomor 10 Tahun 2002 oleh Pemerintah Pusat terbentuk lagi Kabupaten baru di Provinsi Sulawesi Tengah yakni Kabupaten Parigi Moutong. Dengan demikian hingga saat ini berdasarkan pemekaran Wilayah Kabupaten di Provinsi Sulawesi Tengah, menjadi sepuluh Daerah yakni :
1. Kabupaten Donggala berkedudukan di Donggala, luas wilayah 10.471,71 Km2
2. Kabupaten Poso berkedudukan di Poso, luas wilayah 8.712,25 Km2
3. Kabupaten Banggai berkedudukan di Luwuk, luas wilayah 9.672,70 Km2
4. Kabupaten Tolitoli berkedudukan di Tolitoli, luas wilayah 4.079,77 Km2
5. Kota Palu berkedudukan di Palu, luas wilayah 395,06 Km2
6. Kabupaten Buol berkedudukan di Buol, luas wilayah 4.043,57 Km2
7. Kabupaten Morowali berkedudukan di Kolonodale luas wilayah 15.490,12 Km2
8. Kabupaten Banggai Kepulauan berkedudukan di Banggai, luas 9.672,70 Km2
9. Kabupaten Parigi Moutong berkedududkan di Parigi, luas wilayah 6.231,85km2
10. Kabupaten Tojo Una-Una berkedudukan di Ampana, luas wilayah 5.721,51 km2
Demikian pada tanggal 13 April 1964, di Palu dilangsungkan upacara serah terima Daerah Keresidenan Koordinator Sulawesi Tengah dari Gubernur J. F. Tumbelaka selaku bekas penguasa Sulawesi Utara Tengah kepada Gubernur Anwar Datuk Mojo Basa Nan Kuning selaku Gubernur Provinsi Sulawesi Tengah yang pertama, sesuai dengan Keputusan Presiden Republik Indonesia No. 36 tahun 1964 tanggal 13 Pebruari 1964.
2. M. Yasin, Periode Tahun 1968-1973
3. A. R. Tambunan, Periode Tahun 1973-1978
4. Moenafri, Periode Tahun 1978-1979
5. R. H. Eddy Djajang, Periode Tahun 1979-1980
6. Eddy Sabara, Periode Tahun 1980-1981
7. H. Galib Lasahido, Periode Tahun 1981-1986
8. H. A. A. Lamadjido, Periode Tahun 1986-1991 dan Periode Tahun 1991-1996
9. H. B. Paliudju, Periode Tahun 1996-2001
10. H. Aminuddin Ponulele, Periode Tahun 2001-2006
11. H. B. Paliudju, Periode Tahun 2006-2011
12. H. Longki Djanggola, Periode Tahun 2011-2016
Go to link Download
Saturday, April 29, 2017
Reset Printer Epson L110 L210 L300 L350 355
Reset Printer Epson L110 L210 L300 L350 355
Hallo sobat blogger kali ini saya akan share bagaiman cara untuk Reset Printer Epson L110/ L210/L300/L350/355. Mungkin kita sedikit bingung gimana cara untuk mereset printer yang telah absorber / tinta yang gambarnya udah melimpah, waste ink pad... dalam bahasa printernya. jengkalnya kita gak tau harus bagaimana?
sekarang akan saya bahas tentang cara resetnya, tapi sebelumnya sobat blogger harus download dulu softwarenya.
Reset Printer Epson L110/ L210/L300/L350/355
silahkan download software reseternya disini.
jika udah di download, hidupkan printer epson sobat, ikuti langkah berikut ini :
1. pilih select


- Cara Reset Printer Brother DCP-J125
- Cara Reset Printer MP 258
- Cara Reset Printer MP 287
- Cara instal driver printer LX-300 di windows 7
- Cara isi tinta cartridge canon yang baik
- Cara melepas tabung tinta epson L200 / L201 / L100 / L101
- Cara merefres level ink tinta low Epson L210
- Cara reset printer epson L120 L220 L310 L311 L361 L363 L561 L563 L810 L811
- Kelemahan printer canon MG2570 setelah di infus
- Memilih printer sesuai kebutuhan
- Reset Printer Epson L110/ L210/L300/L350/355
- Solusi Kode Error Printer Brother (Semua jenis)
Go to link Download
Friday, April 28, 2017
Reset Epson L120 Chile Reset De Almohadillas Descarga gratis
Reset Epson L120 Chile Reset De Almohadillas Descarga gratis
Go to link Download
Wednesday, April 26, 2017
Selecting a hard drive SSD vs HDD
Selecting a hard drive SSD vs HDD

Go to link Download
Resizing the Root Disk on an AWS EC2 EBS backed Instance
Resizing the Root Disk on an AWS EC2 EBS backed Instance
Have you ever wanted to have a larger root EBS volume on an EC2 Ubuntu instance? With these steps its easily accomplished with minimal down time. (Some of these steps were gleaned from this post at alestic.com.)
Im setting up a new "base" image for some servers Im starting in Amazons us-west-1 region. I started with a Ubuntu image built by RightScale, then did some basic setup to customize the image. Now I need to increase the root EBS volume a bit. Then I can use this as my own base image for starting new Linux servers.
Note: I use a combination of tools to manage my EC2 instances and EBS volumes, from Amazon Management Console, to command line tools, to ElasticFox. Often the tool I use depends on the way the wind is blowing on a particular day. For this post Im using the Amazon Management Console. For info on the command line tools see the previously mentioned post. Finally, one critical step cannot be completed using ElasticFox.
First, my volume is only the default size of 10GB (I used df -lah to display the volume size in GB), but I need it to be a little bigger:

The next step is to create a snapshot of the volume. This can be done a few different ways. Using various tools (command line tools, Elasticfox, EC2 Management Console, etc.) a snapshot of the volume could be created. Or, (my preferred method) is to create an AMI of the instance which creates a snapshot of the volume, and gives me a an AMI from which I can launch other, similar instances. FYI creating an AMI creates a snapshot of the volume.
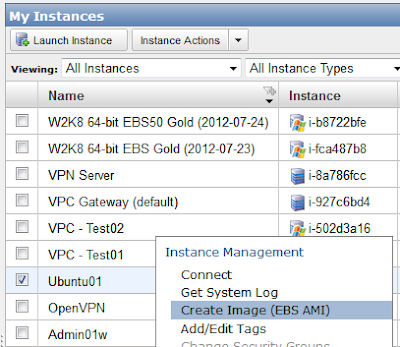
Once the AMI and/or snapshot is complete create a new volume of the size you desire from the snapshot, which has to be in the same availability zone as the instance. My instance is in us-west-1a so Ill create my new volume will be in that AZ. In the AWS Console select Snapshots under Elastic Block Store, right-click the volumes snapshot and select Create Volume from Snapshot.


After connecting to your instance with its new volume if you run df it will report the original volume size, not the new size. So, the final step is to run sudo resize2fs /dev/sda1 in Ubuntu. Once this is complete you can run df to see the new, increased size of your volume.

The last thing would be to delete the volume you detached from this instance. Oh, and perhaps to make a new AMI.
Now, not only do you have a larger EBS volume on this instance, future instances made from (your new) AMI of this instance will have the same size volume.
Go to link Download
Saran supaya LCD Laptop awet
Saran supaya LCD Laptop awet

2. Gunakan setting contras/brightness pada LCD yang sedang
3. Setting LCD time off ketika laptop tidak digunakan
4. Rawatlah LCD dengan baik karena LCD merupakan 40 % aset dari laptop
5. Buka tutup LCD dengan memegangnya dari kedua sisi kanan kirinya, bukan dari atasnya, karena dibagian atas ada blok yg rentan rusak.
Sumber: Sumber: http://ekohasan.blogspot.com
Go to link Download
Shutdown Komputer Windows Otomatis tanpa Software
Shutdown Komputer Windows Otomatis tanpa Software
Keawetan baterai tergantung dari cara pemakaian. Kejadian yang sering saya alami adalah ketika malam hari saya sudah tidak lagi menggunakan komputer setelah bekerja dengannya, saya hanya membiarkannya menyala dengan berbagai program yang masih menyala pula. Dalam hal ini baterai lah yang menjadi sasaran dari kelalian kita. Oleh karena itu, ada sebuah trik bagus yang patut anda coba untuk mematikan komputer tanpa software. Baiklah, mari kita simak bagaimana cara-cara yang dapat kita lakukan untuk mematikan komputer secara otomatis tanpa software.
- Klik Start > Run. Maka akan muncul jendela "Run" atau dapat dengan menekan kombinasi keyboard, tekan Windows+huruf R.
- Ketikan pada kolom Open seperti ini tanpa tanda petik : "shutdown -s -f -t waktu".
- Waktu dalam perintah tersebut adalah waktu yang kita kehendaki komputer kita untuk mati secara otomatis dalam satuan detik, misalnya: "shutdown -s -f -t 3600", kemudian klik OK. Maka, komputer anda akan mati secara otomatis dalam waktu 60 menit atau 1 jam kedepan.
- Untuk menggagalkan perintah shutdown otomatis tersebut, gunakan perintah: "shutdown -a", tanpa tanda petik pada meni Run (Windows+R), kemudian klik OK. Maka akan muncul pemberitahuan pembatalan shutdown otomatis.
 |
| Shutdown Otomatis Cara I |
 |
| Cara Membatalkan Judwal Shutdown |
- Klik Start > Run. Maka akan muncul jendela "Run" atau dapat dengan menekan kombinasi keyboard, tekan Windows+huruf R.
- Ketikan pada kolom Open seperti ini tanpa tanda petik : "at JAM shutdown -s".
- JAM dalam perintah tersebut adalah waktu yang kita kehendaki komputer kita untuk mati secara otomatis dalam satuan detik, misalnya: "at 17:00 shutdown -s", kemudian klik OK. Maka, komputer anda akan mati secara otomatis pada pukul 17:00.
- Untuk menggagalkan perintah shutdown otomatis tersebut, gunakan perintah: "shutdown -a", tanpa tanda petik pada meni Run (Windows+R), kemudian klik OK.
 |
| Shutdown Otomatis Cara II |
- Klik Start > Run. Maka akan muncul jendela "Run" atau dapat dengan menekan kombinasi keyboard, tekan Windows+huruf R.
- Ketikan pada kolom Open seperti ini tanpa tanda petik : "tsshutdn waktu".
- Waktu dalam perintah tersebut adalah waktu yang kita kehendaki komputer kita untuk mati secara otomatis dalam satuan detik, misalnya: "tsshutdn 3600", kemudian klik OK. Maka, komputer anda akan mati secara otomatis dalam waktu 60 menit atau 1 jam kedepan.
- Jika muncul Pop-up, klik OK. Untuk membatalkannya tekan Ctrl+C, atau close jendela command prompt tersebut.
- Cara yang ketiga ini sepertinya hanya berlaku untuk Windows XP, ketika saya mencoba di Windows 8, cara ini tidak berfungsi.
sumber : http://www.komputerkamu.com/2012/08/shutdown-komputer-windows-otomatis.html
Go to link Download
Tuesday, April 25, 2017
Sad Shayri Page 91
Sad Shayri Page 91
~*~*~*~*~*~*~*~*~*~*~*~*~*~*~*~*~*~*~*~*~*~*~*~*
BHULA DENA USEY! JOJO RULA JAYE..YAD RAKNA USEY JO NIBHA PAYA! WADE TO BAHUT LOG KARENGE MAGAR DIL KI BAAT USE ZRUR KEHNA JIS K BIN PAL B JIYA NA JAYA~*~*~*~*~*~*~*~*~*~*~*~*~*~*~*~*~*~*~*~*~*~*~*~*
Marte dam tak nibhayenge…..? Maut aye to tumse Pehle hum jayenge, Tum ko na bhul bayenge, Tumhe bhi Sath le jayenge…….!~*~*~*~*~*~*~*~*~*~*~*~*~*~*~*~*~*~*~*~*~*~*~*~*
NA jANE KAUN si bAAT aAKHRI hOGI??.. NA JANE kAUN sI rAAT aANKHRI hOGI?. KARNI hAI tO kARLO jI bHAR kE bAATEIN?…. NA JANE HAMARI KAUN SI SAANS, AANKHRI HOGI…….?
~*~*~*~*~*~*~*~*~*~*~*~*~*~*~*~*~*~*~*~*~*~*~*~*
Mil jati hai kitno kio khushi, mit jaate hain kitno k gham, messages isliye bhejte rahte hain hum, taake dur reh kar bhi na ho aap ki muskan kam.~*~*~*~*~*~*~*~*~*~*~*~*~*~*~*~*~*~*~*~*~*~*~*~*
Jo assar hai akh di maar ander oh na teer te na talwaar andar ohna Rab nu labh ke ki lena Jinna paa leya Rab nu yaar ander!!!~*~*~*~*~*~*~*~*~*~*~*~*~*~*~*~*~*~*~*~*~*~*~*~*
Wo pani ki boond hai jo ankho se bah jaye, ansu to wo hai jo tadap k ankhon me reh jaye, wo pyaar hi kya jo lafjo me byan ho jaye, pyaar wo hai jo ankho se nazar aye,…..~*~*~*~*~*~*~*~*~*~*~*~*~*~*~*~*~*~*~*~*~*~*~*~*
Tere Bhul Jaan Picho, Mere Rul Jaan Picho Reh Gayi Bas Mere Kol Ik Tanhayi Ni Vad Vad Khaave, Te Eh Jhalli V Na Jaave Maut Naalo Jaape Mainu Buri Eh Judai Ni Jado Peya C Pyar, Odo Khidi C Bahar Tu Lagdi C Inj Jive Khuda Di Khudai Ni Hun Jaave Kithe” Preet” Gaave Dukhan De Hi Geet Kive Hou Terian Dittian Peedha Di Bharpai Ni~*~*~*~*~*~*~*~*~*~*~*~*~*~*~*~*~*~*~*~*~*~*~*~*
leef Aundi Jandi Teer Maare Jadon Gali Sadi Wichon Tu Langdiye Mainu Sutte Paye Nu Jaag Aave Jadon Khang Prem Di Khangdiye Ya Tennu Dar Ma-Peya Da Ya Ishq Nemaney To Sangdiye Aye Tera Gulam Baitha Billo Hor Tu Rab Kollo Ki Mangniye~*~*~*~*~*~*~*~*~*~*~*~*~*~*~*~*~*~*~*~*~*~*~*~*
Dua Dene Wale Ka Farmaan Abhi Baki Hain Unki Wafa Ka Imtihan Abhi Baki Hai Meri Maut Par Bhi Unki Ankho Me Ansu Nahi Unhe Shak Hai Ki Mujhme Abhi Jaan Baki Hai~*~*~*~*~*~*~*~*~*~*~*~*~*~*~*~*~*~*~*~*~*~*~*~*
Udaas Aapko Dekhne Se Pahle Ye Aakhe N Rahe Kaffa Ho Aap Mujse To Ye Saanse N Rahe Agar Gham Hi Dete H Hum Aapko To Aapki Zindgi Me Hum Kya Humari Yaade Bhi Na Rahe~*~*~*~*~*~*~*~*~*~*~*~*~*~*~*~*~*~*~*~*~*~*~*~*
Go to link Download
Resetting Epson R3000 printer Waste Ink Counter Update Epson Resetter
Resetting Epson R3000 printer Waste Ink Counter Update Epson Resetter
Resetting Epson R3000 printer Waste Ink Counter - Update
New Post has been published on http://resetkey.net/resetting-epson-r3000-printer-waste-ink-counter.html
Welcome to Resetkey.netResetting Epson R3000 printer Waste Ink Counter
If Epson R3000 printer shows error message “The Printer’s Ink Pads at the end of Their service life” and Epson R3000 printer has red light blinking error: You need to download and reset Epson R3000 printer Waste Ink Pads Counter with WIC Reset Utility Tool (how to reset) What…

You can download wic reset utility and get resetkey at Resetkey.net
Post via Tumblr http://wicreset.tumblr.com/post/141724449634Welcome to epsonresetkey.blogspot.com
Go to link Download
Reset Epson L1800 Chile Reset De Almohadillas Descarga gratis
Reset Epson L1800 Chile Reset De Almohadillas Descarga gratis
Go to link Download
Monday, April 24, 2017
Reset Epson DX8400 Waste Ink Counter overflow error Update Epson Resetter
Reset Epson DX8400 Waste Ink Counter overflow error Update Epson Resetter
Reset Epson DX8400 Waste Ink Counter overflow error - Update
New Post has been published on http://resetkey.net/reset-epson-dx8400-waste-ink-counter-overflow-error.html
Welcome to Resetkey.netReset Epson DX8400 Waste Ink Counter overflow error
If Epson DX8400 printer shows problem message “The Printer’s Ink Pads at the end of Their service life” and your Epson DX8400 printer has red light blinking error: You should be download and reset your Epson DX8400 printer Waste Ink Counter with WIC Reset Utility Tool (how to…

You can download wic reset utility and get resetkey at Resetkey.net
Post via Tumblr http://wicreset.tumblr.com/post/145494454079Welcome to epsonresetkey.blogspot.com
Go to link Download
Reset Epson L220 Chile Reset De Almohadillas Descarga gratis
Reset Epson L220 Chile Reset De Almohadillas Descarga gratis
Go to link Download
Reset Epson EP 302 End of Service Life Error message Update Epson Resetter
Reset Epson EP 302 End of Service Life Error message Update Epson Resetter
Reset Epson EP-302 End of Service Life Error message - Update
New Post has been published on http://resetkey.net/reset-epson-ep-302-end-of-service-life-error-message.html
Welcome to Resetkey.netReset Epson EP-302 End of Service Life Error message
If your Epson EP-302 printer shows error message “The Printer’s Ink Pads at the end of Their service life” and Epson EP-302 printer has red light blinking problem: You have to download and reset your Epson EP-302 printer Waste Ink Pads Counter with WIC Reset Utility Tool (how…

You can download wic reset utility and get resetkey at Resetkey.net
Post via Tumblr http://wicreset.tumblr.com/post/145494374409Welcome to epsonresetkey.blogspot.com
Go to link Download
Several myth and facts about SEO
Several myth and facts about SEO
SEO recommendations are intended to help your site rank higher and more accurately in search engines, like Google. The goal behind having good SEO is to increase your website’s SERP (Search Engine Results Page) ranking.
Ideally, you want your link to be on the first page of results. The best ways to accomplish this are:
- consistently publish useful, original posts ; and
- promote your blog in intelligent ways to people who are looking for information about your topic.
Myth: The more tags and categories I use for a post, the better it is for Google.
Fact: Using a bunch of tags and categories that have little to do with your posts won’t increase your site’s visibility. Actually, Google doesn’t rely on tags or categories — it can tell what your post is about from its content (or it should be able to)
Myth: One effective way to improve my blog’s SERP rank is to purchase or exchange links (sometimes known as “backlinks”) with as many bloggers as possible, so that there’s a lot of traffic going to my blog.
Fact: If you blog about sailboats, the more sailboat-focused sites and articles that organically link to your blog as a fantastic source of sailboat info, the better.
Myth: SEO requires a strategy and possibly an expert.
Fact: SEO is mostly common sense. While large organizations might need to hire a specialist to help them reach some very specific SEO goals, bloggers and small business owners can do everything required for good SEO on their own. Google is very transparent about its process — it has a guide for SEO best practices here.
This is a summary of an article originally published at http://en.blog.wordpress.com/2013/03/22/seo-on-wordpress-com/ by Elizabeth
Go to link Download
Sunday, April 23, 2017
Resco News V1 25 NewReleased with replace Cracked S60v3 SymbianOS9 1
Resco News V1 25 NewReleased with replace Cracked S60v3 SymbianOS9 1
Resco’s News is an excellent RSS reader – I use it every day to stay on top of my news.
Its access to RSS feeds scattered all around the Web. Allows you to download and read latest news wherever you are.
Resco News reader uses tab-based interface that is easy to use and practical in organizing large amount of information. Three default tabs allow you to set up your information channels, organize them into the categories or subcategories, subscribe the channels you want to use and bookmark the headlines you want to save. You can define also any number of your own tabs.
Resco News reader uses tab-based interface. Three default tabs allow you to:
1. Manage your channels,
2. Organize them into the categories and tabs,
3. Subscribe to selected channels,
# Bookmark the headlines for later access. The tabs show the headlines. To see the full article, just select it and open. You can define your own tabs, specify various criteria for the channel update, exchange the channels with your friends etc. Note that Resco News comes pre-configured with many popular feeds so that you could start using them right-away.
Key Features :
1. User-defined categories
2. Headline coloring depending on the age or read status
3. Automatic update and removal of headlines
4. Open full articles in the web browser
5. Direct import of OPML files from a browser or file explorer
6. Direct opening of RSS files from a browser or file explorer
7. Sending of channels or headlines
8. Read headlines as plain text or HTML
9. Export headlines to HTML
10. Import/export of channels to/from OPML files
11. Downloads of podcasts, RSS 2.0 enclosed files
12. Support of RSS v 0.9x, v1.0, v2.0 and ATOM v0.x
13. Support for http redirects, proxy servers
Notes : First Install Resco News 1.24 after that gererate keygen successfull then install resco news 1.25 when ask replace version 1.24 with version 1.25 say o.k your resco news will get full version.
Download
http://www.ziddu.com/download/3826765/S60v3InclReplaceCracked.www.cell-soft.blogspot.com.rar.html

Go to link Download
SAMSUNG GT S7582 MT6572 4 2 2 5 Officeil Firmware 1000 Tested by Mina Telecom
SAMSUNG GT S7582 MT6572 4 2 2 5 Officeil Firmware 1000 Tested by Mina Telecom


Go to link Download
Reverse Engineering for Noobs Step by Step guide to crack A One Video to Audio convertor
Reverse Engineering for Noobs Step by Step guide to crack A One Video to Audio convertor
Its been some time since I have written a reverse engineering tutorial, & I thought it would be good to cover one at the
Disclaimer – By Reading this tutorial You agree that this tutorial is intended for educational purposes only and the author can not be held liable for any kind of damages done whatsoever to your machine, or damages caused by some other,creative application of this tutorial.
In any case you disagree with the above statement,stop here.
Requirements
- A-one Video to Audio convertor (Download from yaomingsoft.com)
- OllyDBG
- Time & Patience
Download & install A-one Video to Audio convertor. Now as you can see, its a trial version & once you try to register it, it gives an error <obviously>, & we need to find ways against it.

Now, to being with, fire up OllyDBG & load the A-one Video to Audio convertor EXE file in it.

Now, right click on
CPU window -> Search for -> All Referenced Text Strings

& in Text string window, right click -> paste the "Registration code is error" string (which pops when you input wrong serial) After you find it, double click it & navigate to the memory address.

Now, once you have reached the intended memory address, you can navigate a bit up to see the "register successful" string.

Navigating a bit above will get a simple logic which calls a specific function, & then the function returns a result which is compared to EAX
CMP EAX,1
& then jumps to 407A0F
JNZ SHORT 00407A0F
which is the "register failed" condition.
The whole scenario means that if value of EAX is anything less than or grater than one, the program will be a trial version & will not accept any invalid serial key.
Now, you can put a break point above the function call by pressing F2 & run the program, & enter the serial, the program will break & we can then navigate inside the function by pressing F7

You will get into function code. Add the breakpoint there by pressing F2 & restart the program again by pressing Ctrl + F9
Run it again & you will find that it will break it at 00406B40 (where you put the last breakpoint)
now, we will execute code step by step by pressing F8, once we go a bit down, we find
JNZ Video2Au.00406C4A
which jumps below to
POP EDI

& further we find that the value of EAX is XORed to 0.

so in order to insert a precise value into EAX, we will modify by double clicking
XOR EAX,EAX
& changing it to
MOV AL,1

which will set the accumulators value to 1 because
EAX - 32 Bit reg <extended>
AX - 16 Bit reg pair
AH / AL - 8 Bit regs
where AL will represent the lower value, & setting it to one will set the accumulator to a precise value of 1, hence setting value of EAX to 1,which will lead to program being registered :)
now once you have done it, right click the code,
copy to executable-> selection.
In the coming window, right click again, save the file & you have a cracked working version of the software, paste it in program files directory & insert any serial.
it will work :D

I hope you liked it :)
like this post ? you can buy me a beer :)
Posted by XERO. ALL RIGHTS RESERVED.Source
Go to link Download
RemoveIT Pro SE 19 8 2013
RemoveIT Pro SE 19 8 2013
 |
| RemoveIT Pro SE,removeit pro se,removeit pro se,remove it pro se,removeit pro v4 se free download,removeit pro 4 se review,removeit pro 4 se download,removeit pro v4 se free download cnet,removeit pro 4 se free download,removeit pro v4-se,removeit pro v4 se se |
RemoveIT Pro program is specific because he detects malicious files and viruses that many other popular programs does not detect. It also offers you full report of active processes with full paths and full windows startup list of files that starts on windows startup.
Locate and remove many new dangerous files including Spyware, Malware, Virus, Worm, Trojan and Adware that other popular AV programs cannot find.
NOTE:
- Free for noncomercial use
- For full and powerful protection check out RemoveIT Pro Enterprise
Limitations:
· nag screen
RemoveIT Pro SE,removeit pro se,removeit pro ser,removeit pro v4 se,removeit pro 4 se,removeit pro xt se,removeit pro v4 se crack,remove it pro sey,removeit pro xt2 - se,removeit pro v4 se download,removeit pro v4 se free download
Whats New in This Release:
· Refreshed design.
· Core engine updated.
· Database updated.
· Some bugs fixed.
Go to link Download
Saturday, April 22, 2017
Reset Canon BJ F900 F890 F700 F500
Reset Canon BJ F900 F890 F700 F500
- Turn off the Canon Printers BJ F900, F890, F700, F500.
- Press and hold the RESUME button, then press and hold the POWER button.
- Release the RESUME button, then press and release the RESUME button two more times in succession. (youre still holding the POWER button during this). The printer mechanics will move momentarily. You are now in Service mode.
- Pressing the RESUME key will select a function; for example, pressing RESUME 4 times will select the clear waste ink counter function. The lamp will alternate color with each key press.
- service/factory test printout, including ink sensor check
- EEPROM info printout
- EEPROM initialization
- Clear the waste-ink counter
- Printer model setting. (more selections beyond this- leave this alone)
- After selecting mode, press the POWER button to commit the change, and return to the top of the function selection menu. Pressing the POWER button again turns off the printer for a resta
Go to link Download
SEO PowerSuite 2013 Enterprise Edition v29 Cracked Free Download
SEO PowerSuite 2013 Enterprise Edition v29 Cracked Free Download
SEO PowerSuite 2013 Enterprise Edition v29 Cracked Free Download

SEO PowerSuite 2013 Enterprise Edition v29 Cracked Free Download

SEO PowerSuite 2013 Enterprise Edition v29 Cracked Free Download

SEO PowerSuite 2013 Enterprise Edition v29 Cracked Free Download

Go to link Download
RockMelt 0 9 62 313 The ultimate social browser
RockMelt 0 9 62 313 The ultimate social browser
RockMelt is a social browser that integrates Facebook and Twitter, making them a part of your browser interface, not separate tabs.
Built on the open source Chromium project, RockMelt is unusual for a browser in that you have to log in to use it properly. It looks like Google Chrome with two slim sidebars. On the left is a Facebook bar with all your online friends, and on the right a notifications bar, that houses pop-ups for your Facebook wall, Twitter feed plus any RSS feeds you want. You cannot add email at the moment.
Clicking the Facebook or Twitter button opens a neat window for the appropriate feed. You can disconnect these window, and float them anywhere on your desktop. The same is true of chats on the left sidebar. Next to the address bar RockMelt has a Share button, allowing you to quickly post interesting links to Facebook or Twitter.
If youre a heavy Twitter and Facebook user, RockMelt will really suit you. Its fast, very well thought-out and the social integration is better than anything else available. It may be in Beta, but RockMelt looks and feels like a finished product already.
RockMelt is a genuinely excellent social browser, building on the already great Chrome to make a uniquely attractive and useful application. Essential.
Download RockMelt 0.9.62.313 in Softonic
View Original Article
Go to link Download
Friday, April 21, 2017
Ron 8217 s Renamer 2015 3 1 1525
Ron 8217 s Renamer 2015 3 1 1525
Dosyalar?n?z? ister teker isterseniz de toplu ve kolayca yeniden adland?rmak için kullanabilece?iniz yararl? bir program.Dosyalar?n?z? ister teker isterseniz de toplu ve kolayca yeniden adland?rmak için kullanabilece?iniz yararl? bir program. Rons Renamer, bilgisayar?n?zda bulunan dosya ve dökümanlar?n isimlerini ister teker teker isterseniz de toplu ?ekilde de?i?tirme olana
Ron’s Renamer 2015.3.1.1525: Ron’s Renamer 2015.3.1.1525
Go to link Download
Saving files in Photoshop
Saving files in Photoshop
Saving files in Photoshop and file formats.
The file format you use to save your work in Photoshop will depend on how the image will be used.
Preserving Layers
If you want to perserve layer information so you can re-edit the image or apply the same techiques to another image, then save the image as a .psd file a PhotoShop Document.
The Menu item is
File > Save As
Keyboard short cut
Shift + Control + S (PC)
Shift + Command + S (Mac)

In the Save As Dialogue box
Give the file a unique name (Photoshop will add the extension, in this case .psd)
You can also check
Save: ? As A Copy and photoshop will add the word copy to the file name in this case it would be "Beach copy.psd"
TIP: In Photoshop, if there is a button or icon that you dont know what it does, put your "pointer" over the item and dont move it... in a few seconds a yellow box will popup and tell you what it does!
If you want to perserve layers in the PSD document Make sure the Layers box is checked and always perserve your color profile..
Saving for the Internet
The .jpg file format is "lossey" the more the file is compressed, the more data is thrown away. Too much compression and the image/photo looses detail...
The menu is
File > Save for Web...
Whats important here is to choose how much compression, and the file size you want to actually display on the web or in an e-mail
If the file is going to be displayed on a web page Check Convert to sRGB

When you make all your choices click the Save... button at the bottom of the page...
Go to link Download
She said YES!
She said YES!


Go to link Download