Sunday, March 12, 2017
Search Operation on Android online Database JSON
Search Operation on Android online Database JSON
For the database setup, please refer to http://blog.kerul.net/2014/04/insert-new-record-on-android-online.html
INTRODUCTION
This tutorial will demonstrate how to retrieve an records form an online database. We are using the JSON data format to transfer the database content to the Android client.
 |  |
STEP 1: JSON DATA FORMAT GENERATOR (server-side)
Overview illustration (click to enlarge)
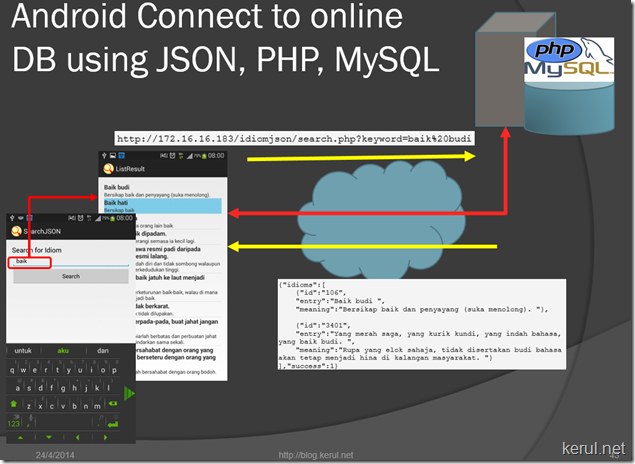
In order to fetch records form the database, we will use the JSON data format generator using the PHP script. Add this file named search.php to the existing folder in the idiomjson folder, in htdocs. (Refer STEP 1 of this article http://blog.kerul.net/2014/04/insert-new-record-on-android-online.html)

search.php
<?php
//search.php
/*
 * Following code will search idiom based on keywords
 */

// array for JSON response
$response = array();

// include connect class
require_once __DIR__ . /connect.php;

// connecting to db
$db = new DB_CONNECT();

$keyword=$_GET["keyword"];
// get idioms based on keyword
/*
$result = mysql_query("SELECT * FROM a_senarai_e WHERE " .
 "MATCH(entri) AGAINST ($keyword ".
 "IN NATURAL LANGUAGE MODE)") or die(mysql_error());
*/

//using LIKE
$result = mysql_query("SELECT * FROM idiomlist WHERE entry LIKE %$keyword% LIMIT 0, 20")
or die(mysql_error());

// check for empty result
if (mysql_num_rows($result) > 0) {
 // looping through all results
 $response["idioms"] = array();

 while ($row = mysql_fetch_array($result)) {
 // temp user array
 $idioms= array();
 $idioms["id"] = $row["id"];
 $idioms["entry"] = $row["entry"];
 $idioms["meaning"] = $row["meaning"];

 // push single idiom array into final response array
 array_push($response["idioms"], $idioms);
 }
 // success
 $response["success"] = 1;

 // echoing JSON response
 echo json_encode($response);
} else {
 // no products found
 $response["success"] = 0;
 $response["message"] = "No idioms found";

 // echo no users JSON
 echo json_encode($response);
}
?>
When the page is called directly from the browser, this is the JSON formatted data you will see.
http://172.16.16.183/idiomjson/search.php?keyword=baik%20budi

{"idioms":[
 {"id":"106",
 "entry":"Baik budi ",
 "meaning":"Bersikap baik dan penyayang (suka menolong). "},

 {"id":"3401",
 "entry":"Yang merah saga, yang kurik kundi, yang indah bahasa, yang baik budi. ",
 "meaning":"Rupa yang elok sahaja, tidak disertakan budi bahasa akan tetap menjadi hina di kalangan masyarakat. "}
],"success":1}
STEP 2: CREATE A NEW PROJECT IN ECLIPSE-ADT (Android client-side)

The UI consist of an EditText with id txtkeyword, and a Button id btnsearch.
This is the UI XML file
<RelativeLayout >="http://schemas.android.com/apk/res/android"
 >="http://schemas.android.com/tools"
 android:layout_width="match_parent"
 android:layout_height="match_parent"
 android:paddingBottom="@dimen/activity_vertical_margin"
 android:paddingLeft="@dimen/activity_horizontal_margin"
 android:paddingRight="@dimen/activity_horizontal_margin"
 android:paddingTop="@dimen/activity_vertical_margin"
 tools:context=".Search" >

 <TableLayout
 android:layout_width="wrap_content"
 android:layout_height="wrap_content"
 android:layout_alignParentBottom="true"
 android:layout_alignParentLeft="true"
 android:layout_alignParentRight="true"
 android:layout_alignParentTop="true" >

 <TableRow
 android:id="@+id/tableRow1"
 android:layout_width="wrap_content"
 android:layout_height="wrap_content" >

 <TextView
 android:id="@+id/textView1"
 android:layout_width="wrap_content"
 android:layout_height="wrap_content"
 android:text="Search for Idiom"
 android:textAppearance="?android:attr/textAppearanceLarge" />

 </TableRow>

 <TableRow
 android:id="@+id/tableRow2"
 android:layout_width="wrap_content"
 android:layout_height="wrap_content" >

 <EditText
 android:id="@+id/txtkeyword"
 android:layout_width="0dp"
 android:layout_height="wrap_content"
 android:layout_weight="1"
 android:ems="10" >

 <requestFocus />
 </EditText>

 </TableRow>

 <TableRow
 android:id="@+id/tableRow3"
 android:layout_width="wrap_content"
 android:layout_height="wrap_content" >

 <Button
 android:id="@+id/btnsearch"
 android:layout_width="0dp"
 android:layout_height="wrap_content"
 android:layout_weight="1"
 android:text="Search" />

 </TableRow>

 <TableRow
 android:id="@+id/tableRow4"
 android:layout_width="wrap_content"
 android:layout_height="wrap_content" >
 </TableRow>
 </TableLayout>

</RelativeLayout>
Search.java
This is only has the UI of the keyword entry. It will be calling another page/screen which will list the idioms that match the search keyword.
package net.kerul.searchjson;//change this to ur package name

import android.os.Bundle;
import android.app.Activity;
import android.content.Intent;
import android.view.Menu;
import android.view.View;
import android.view.View.OnClickListener;
import android.widget.Button;
import android.widget.EditText;

public class Search extends Activity implements OnClickListener {
 private EditText txtkeyword;
 private Button btnsearch;

 @Override
 protected void onCreate(Bundle savedInstanceState) {
 super.onCreate(savedInstanceState);
 setContentView(R.layout.activity_search);

 //link to UI
 txtkeyword=(EditText)findViewById(R.id.txtkeyword);
 btnsearch=(Button)findViewById(R.id.btnsearch);
 btnsearch.setOnClickListener(this);
 }
 @Override
 public void onClick(View v) {
 if(v.getId()==R.id.btnsearch){
 Intent searchIntent = new Intent(this, Search.class);
 //send the keyword to the next screen
 searchIntent.putExtra("key",txtkeyword.getText().toString());
 //call the screen for listing
 startActivity(searchIntent);
 }

 }

 @Override
 public boolean onCreateOptionsMenu(Menu menu) {
 // Inflate the menu; this adds items to the action bar if it is present.
 getMenuInflater().inflate(R.menu.search, menu);
 return true;
 }

}
Create the ListView named ListResult activity to handle the result listing.
To create a new activity, right click on project and choose New –> Other…
Use the name ListResult for the new activity.
 |  |
inside this UI XML file copy paste the following XML code. It must have ListView with the id named list.
activity_list_result.xml
<RelativeLayout >="http://schemas.android.com/apk/res/android"
 >="http://schemas.android.com/tools"
 android:layout_width="match_parent"
 android:layout_height="match_parent"
 android:paddingBottom="@dimen/activity_vertical_margin"
 android:paddingLeft="@dimen/activity_horizontal_margin"
 android:paddingRight="@dimen/activity_horizontal_margin"
 android:paddingTop="@dimen/activity_vertical_margin"
 tools:context=".ListResult" >

 <!-- Main ListView
 Always give id value as list(@android:id/list)
 -->
 <ListView
 android:id="@android:id/list"
 android:layout_width="fill_parent"
 android:layout_height="wrap_content"/>

</RelativeLayout>
Then add another XML file in the layout folder, by right clicking on the layout folder->New->Android XML File. This is to show the record. It will be reiterated for all records successfully fetched. It must be named list_view.xml; it will be called by activity_list_result.xml to populate the idiom data.


list_view.xml
<?xml version="1.0" encoding="utf-8"?>
<LinearLayout >="http://schemas.android.com/apk/res/android"
 android:layout_width="fill_parent"
 android:layout_height="wrap_content"
 android:orientation="vertical" >

 <!-- Idioms id will be HIDDEN - used to pass to other activity -->
 <TextView
 android:id="@+id/id"
 android:layout_width="fill_parent"
 android:layout_height="wrap_content"
 android:visibility="gone" />

 <!-- Entry data display -->
 <TextView
 android:id="@+id/entry"
 android:layout_width="fill_parent"
 android:layout_height="wrap_content"
 android:textSize="17dip"
 android:textStyle="bold" />
 <!-- the Meaning data display -->
 <TextView
 android:id="@+id/meaning"
 android:layout_width="fill_parent"
 android:layout_height="wrap_content"
 android:textSize="14dip" />

</LinearLayout>
and the ListResult.java file to do the fetch record and display processes.
ListResult.java
package net.kerul.searchjson;//change to your package name

import java.util.ArrayList;
import java.util.HashMap;
import java.util.List;

import org.apache.http.NameValuePair;
import org.apache.http.message.BasicNameValuePair;
import org.json.JSONArray;
import org.json.JSONException;
import org.json.JSONObject;

import android.app.ListActivity;
import android.app.ProgressDialog;
import android.content.Intent;
import android.os.AsyncTask;
import android.os.Bundle;
import android.util.Log;
import android.view.View;
import android.widget.AdapterView;
import android.widget.AdapterView.OnItemClickListener;
import android.widget.ListAdapter;
import android.widget.ListView;
import android.widget.SimpleAdapter;
import android.widget.TextView;
import android.widget.Toast;

public class ListResult extends ListActivity {

 // Progress Dialog
 private ProgressDialog pDialog;

 // Creating JSON Parser object
 JSONParser jParser = new JSONParser();

 ArrayList<HashMap<String, String>> idiomsList;

 // url to get the idiom list
 private static String url_search = "http://172.16.16.183/idiomjson/search.php";

 // JSON Node names
 private static final String TAG_SUCCESS = "success";
 private static final String TAG_IDIOMS = "idioms";
 private static final String TAG_ID = "id";
 private static final String TAG_ENTRY = "entry";
 private static final String TAG_MEANING = "meaning";

 // products JSONArray
 JSONArray idioms = null;
 //search key value
 public String searchkey;

 @Override
 public void onCreate(Bundle savedInstanceState) {
 super.onCreate(savedInstanceState);
 setContentView(R.layout.activity_list_result);
 Intent myIntent = getIntent();
 // gets the arguments from previously created intent
 searchkey = myIntent.getStringExtra("keyword");

 // Hashmap for ListView
 idiomsList = new ArrayList<HashMap<String, String>>();

 // Loading idioms in Background ThreadGo to link Download

Wednesday, September 28, 2016
Serpihan Kode Database Access
Serpihan Kode Database Access
Serpihan Kode Database Access
- Nama Database : DBPembelajaran.mdb format Microsoft Office Access 2000
- Nama Tabel : SiswaLogin
- Nama Field dalam Tabel SiswaLogin : Nama Field Nama_Siswa TypeField Text dan field kedua Nama Field NIS TypeField Text
- Klik Menu Project Pilih References.. : Microsoft ActiveX Data Object 2.0 Library atau versi yang lebih tinggi.
1. a. Koneksi Dengan Database Yang Tidak Berpassword
Option Explicit
Dim db As ADODB.Connection
Dim adoPrimaryRSLoginSiswa As ADODB.Recordset

Private Sub Form_Load()
On Error GoTo err
 Set db = New ADODB.Connection
 db.CursorLocation = adUseClient
 db.Open "PROVIDER=Microsoft.Jet.OLEDB.4.0;" & _
 "Data Source=" & App.Path & "DBPembelajaran.mdb;"
err:
 If db.State = 1 Then
 MsgBox "Terkoneksi dengan database"
 ElseIf db.State = 0 Then
 MsgBox "Tidak Terkoneksi dengan database.", vbInformation, "Error"
 End If
End Sub
1. b. Koneksi Dengan Database Berpassword
Private Sub Form_Load()
On Error GoTo ERR
 Dim DBBerPassword
 Set DBBerPassword = New ADODB.Connection
 DBBerPassword.CursorLocation = adUseClient
 DBBerPassword.Open "PROVIDER=Microsoft.Jet.OLEDB.4.0;Data Source=" & App.Path & "DBPembelajaran - Copy.mdb" & ";Persist Security Info=False;Mode=12;Jet OLEDB:Database Password=TulisPasswordnya"
ERR:
 If DBBerPassword.State = 1 Then
 MsgBox "Terkoneksi dengan database"
 ElseIf DBBerPassword.State = 0 Then
 MsgBox "Tidak Terkoneksi dengan database.", vbInformation, "Error"
 End If
End Sub
2. Buka Record
Private Sub Command1_Click()
On Error GoTo err
 Set adoPrimaryRSLoginSiswa = New ADODB.Recordset
 adoPrimaryRSLoginSiswa.Open "TblSiswaLogin", db, adOpenStatic, adLockOptimistic
err:
 If adoPrimaryRSLoginSiswa.State = 1 Then
 MsgBox "Terkoneksi dengan Tabel"
 ElseIf adoPrimaryRSLoginSiswa.State = 0 Then
 MsgBox "Tabel tidak ditemukan, cek kembali tabel yang ada dalam database.", vbInformation, "Error"
 End If
End Sub
3. Cek Isi Field
Private Sub Command2_Click()
 adoPrimaryRSLoginSiswa.MoveFirst
 MsgBox "NAMA FIELD : " & adoPrimaryRSLoginSiswa.Fields(0).Name & _
 vbCrLf & "ISI FIELD RECORD PERTAMA : " & adoPrimaryRSLoginSiswa.Fields(0).Value, vbInformation
End Sub
4. Menghubungkan Isi Field Ke Control
Private Sub Command3_Click()
 Set Me.Text1.DataSource = adoPrimaryRSLoginSiswa
 Set Me.Text2.DataSource = adoPrimaryRSLoginSiswa

 Me.Text1.DataField = "NAMA_SISWA"
 Me.Text2.DataField = "NIS"

End Sub
5. Mengecek Field Kosong (IsNull)
Private Sub Command4_Click()
 DI PROPERTY Text3 MultiLine pilih True
 DI PROPERTY Text3 ScrollBars pilih 3
 Text3.Text = "MENGECEK FIELD NIS KOSONG"
 adoPrimaryRSLoginSiswa.MoveFirst
 While Not adoPrimaryRSLoginSiswa.EOF
 If IsNull(adoPrimaryRSLoginSiswa.Fields("NIS")) = True Then
 Text3.Text = Text3.Text & vbCrLf & "NO : " & adoPrimaryRSLoginSiswa.AbsolutePosition & ". " & adoPrimaryRSLoginSiswa.Fields("NAMA_SISWA").Value & " KOSONG"
 ElseIf IsNull(adoPrimaryRSLoginSiswa.Fields("NIS")) = False Then
 Text3.Text = Text3.Text & vbCrLf & "NO : " & adoPrimaryRSLoginSiswa.AbsolutePosition & " TIDAK KOSONG "
 End If
 adoPrimaryRSLoginSiswa.MoveNext
 Wend
End Sub
6. Navigasi
Private Sub Command5_Click()
 If adoPrimaryRSLoginSiswa.AbsolutePosition = 1 Or adoPrimaryRSLoginSiswa.RecordCount = 0 Then
 Beep
 Else
 adoPrimaryRSLoginSiswa.MoveFirst Ke record Pertama
 End If
 Me.Label2.Caption = "NO. " & adoPrimaryRSLoginSiswa.AbsolutePosition
End Sub

Private Sub Command6_Click()
 If adoPrimaryRSLoginSiswa.AbsolutePosition = 1 Or adoPrimaryRSLoginSiswa.RecordCount = 0 Then
 Beep
 Else
 adoPrimaryRSLoginSiswa.MovePrevious "Ke record Sebelumnya End If
 Me.Label2.Caption = "NO. " & adoPrimaryRSLoginSiswa.AbsolutePosition
End Sub

Private Sub Command7_Click()
 If adoPrimaryRSLoginSiswa.AbsolutePosition = adoPrimaryRSLoginSiswa.RecordCount Or adoPrimaryRSLoginSiswa.RecordCount = 0 Then
 Beep
 Else
 adoPrimaryRSLoginSiswa.MoveNext Ke record Selanjutnya End If
 Me.Label2.Caption = "NO. " & adoPrimaryRSLoginSiswa.AbsolutePosition
End Sub

Private Sub Command8_Click()
 If adoPrimaryRSLoginSiswa.AbsolutePosition = adoPrimaryRSLoginSiswa.RecordCount Or adoPrimaryRSLoginSiswa.RecordCount = 0 Then
 Beep
 Else
 adoPrimaryRSLoginSiswa.MoveLast Ke record Terakhir End If
 Me.Label2.Caption = "NO. " & adoPrimaryRSLoginSiswa.AbsolutePosition
End Sub
6. Mendapatkan Tabel Dalam database
Private Sub Command9_Click()
Dim NamaTabel As ADODB.Recordset
Set NamaTabel = db.OpenSchema(adSchemaTables)
 While Not NamaTabel.EOF
 If NamaTabel!TABLE_TYPE = "TABLE" Then Text4.Text = Text4.Text & vbCrLf & NamaTabel!TABLE_NAME
 NamaTabel.MoveNext
 Wend
End Sub
7. Mendapatkan Field Dalam Tabel
Private Sub Command10_Click()
Dim Column As ADODB.Field
If adoPrimaryRSLoginSiswa.State = adStateOpen Then
 For Each Column In adoPrimaryRSLoginSiswa.Fields
 Text5.Text = Text5.Text & vbCrLf & Column.Name
 Next
End If
End Sub
8. Membuat Tabel - Create Table
Private Sub Command11_Click()
 Dim Cmd As New ADODB.Command
 Cmd.ActiveConnection = db
 Cmd.CommandText = "create table TabelBaru (NAMA_SISWA varchar(20), KELAS varchar(5), TENTANG_SISWA LongChar, Foto LongBinary)"
 Cmd.Execute
End Sub
9. Menambahkan Field Di Tabel Yang Sudah Ada - Add Field In Exists Table
Private Sub Command12_Click()
Tambahkan references Microsoft ADO Ext. 2.1 for DDL and Security atau versi lebih tinggi
 Dim Xconx As ADODB.Connection
 Dim Xcmd As ADODB.Command
 Dim Xrs As ADODB.Recordset
 Dim m_MDBdatabase As String
 Dim m_MDBtable As String

Tambahkan columns di tabel yang sudah ada
 Dim ADOXcat As ADOX.Catalog
 Dim MStbl As ADOX.table
 Dim MScol As ADOX.Column

 m_MDBdatabase = App.Path & "DBPembelajaran.mdb"
 m_MDBtable = "TblSiswaLogin"

Membuat koneksi
 Set Xconx = New ADODB.Connection
 Set Xcmd = New ADODB.Command
 Set Xrs = New ADODB.Recordset
 Set Xconx = CreateObject("ADODB.Connection")
 Xconx.Open "Provider=Microsoft.Jet.OLEDB.4.0;" & _
 "Persist Security Info=False;" & _
 "Data Source=" & m_MDBdatabase
 Set Xrs = CreateObject("ADODB.Recordset")
 Xrs.CursorLocation = adUseServer

Mengirimkan MDB dan table ke catalog
 Set ADOXcat = New ADOX.Catalog
 ADOXcat.ActiveConnection = _
 "Provider=Microsoft.Jet.OLEDB.4.0;" & _
 "Data Source=" & m_MDBdatabase
 Set MStbl = ADOXcat.Tables(m_MDBtable)

Menambahkan columns/Field ke tabel yang ada
 MStbl.Columns.Append "NILAI", adDouble
 MStbl.Columns.Append "KETERANGAN", adVarWChar, 255
 MStbl.Columns.Append "TANGGAL_LAHIR", adDate

Bersihkan
 ADOXcat.ActiveConnection.Close
 Set ADOXcat = Nothing
 Set MStbl = Nothing
 Set MScol = Nothing
 Set Xconx = Nothing
 Set Xcmd = Nothing
 Set Xrs = Nothing
End Sub
10. Hapus Semua Record Dalam Tabel
Private Sub Command13_Click()
 db.Execute "DELETE FROM TBLsiswalogin"
End Sub
11. Hapus Tabel
Private Sub Command14_Click()
Tambahkan references Microsoft DAO 3.6 Object Library atau versi lebih tinggi
 Dim ConMateri As Database, AdoDao%
 Set ConMateri = OpenDatabase(App.Path & "DBPembelajaran.MDB", False, False, "MS Access;Pwd=dbpwd")
 Dim TbDef As TableDefs
 Set TbDef = ConMateri.TableDefs
 ConMateri.TableDefs.Delete "NamaTabelYangAkanDiHapus"
End Sub
Go to link Download