Wednesday, April 26, 2017
Resizing the Root Disk on an AWS EC2 EBS backed Instance
Resizing the Root Disk on an AWS EC2 EBS backed Instance
Have you ever wanted to have a larger root EBS volume on an EC2 Ubuntu instance? With these steps its easily accomplished with minimal down time. (Some of these steps were gleaned from this post at alestic.com.)
Im setting up a new "base" image for some servers Im starting in Amazons us-west-1 region. I started with a Ubuntu image built by RightScale, then did some basic setup to customize the image. Now I need to increase the root EBS volume a bit. Then I can use this as my own base image for starting new Linux servers.
Note: I use a combination of tools to manage my EC2 instances and EBS volumes, from Amazon Management Console, to command line tools, to ElasticFox. Often the tool I use depends on the way the wind is blowing on a particular day. For this post Im using the Amazon Management Console. For info on the command line tools see the previously mentioned post. Finally, one critical step cannot be completed using ElasticFox.
First, my volume is only the default size of 10GB (I used df -lah to display the volume size in GB), but I need it to be a little bigger:

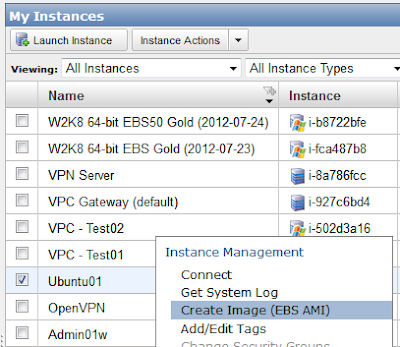
The next step is to create a snapshot of the volume. This can be done a few different ways. Using various tools (command line tools, Elasticfox, EC2 Management Console, etc.) a snapshot of the volume could be created. Or, (my preferred method) is to create an AMI of the instance which creates a snapshot of the volume, and gives me a an AMI from which I can launch other, similar instances. FYI creating an AMI creates a snapshot of the volume.
Once the AMI and/or snapshot is complete create a new volume of the size you desire from the snapshot, which has to be in the same availability zone as the instance. My instance is in us-west-1a so Ill create my new volume will be in that AZ. In the AWS Console select Snapshots under Elastic Block Store, right-click the volumes snapshot and select Create Volume from Snapshot.


After connecting to your instance with its new volume if you run df it will report the original volume size, not the new size. So, the final step is to run sudo resize2fs /dev/sda1 in Ubuntu. Once this is complete you can run df to see the new, increased size of your volume.

The last thing would be to delete the volume you detached from this instance. Oh, and perhaps to make a new AMI.
Now, not only do you have a larger EBS volume on this instance, future instances made from (your new) AMI of this instance will have the same size volume.
Go to link Download